Showing posts with label Allgemein. Show all posts
Showing posts with label Allgemein. Show all posts
Saturday, February 25, 2017
In this tutorial I will discuss how to create automatic Carousel slider based on your labels in blogger. All you have to do only replace with your own label and the slider will work based on the label that you add in Edit HTML template. I made this carousel slider was very simple and only used jCarousellite script without adding easing effects or mousewheel.

- You must login to blogger with your account
- After that select the blog that you want to add slider.
- Go to the template >> Edit HTML and check the expand widget templates, don't forget to backup your template first.
- And then place this following codes above ]]></b:skin>: #carouselwidth:950px;height:185px;margin-bottom:0px;position:relative;display:block
#carousel .containerposition:absolute;left:49px;width:895px;height:185px;overflow:hidden;background:url(https://blogger.googleusercontent.com/img/b/R29vZ2xl/AVvXsEiuzHYrmdpMRVSPmJnkRBXk0TXxjcrasYNlVzVOcHWg4WXiotLQyidtl9pwKi2KhW_h8ZuMnVTArpdhxmeQwnoG1BRSw8OcCgW0_ay5hIfMJ2Z5EM_vLqJL5xMxRoqomw-BLWCULmko-ss/s1600/scroller-bg.png) repeat center
#carousel #previous_buttonposition:absolute;width:49px;height:185px;background:url(https://blogger.googleusercontent.com/img/b/R29vZ2xl/AVvXsEiy5Oak2feYqZtRoktKV5D3nW82fGMN85J0dLi2_Vm0sg1ad9lKEGN4fWBgvb54rB6CcTKtTrJ714eW8xpn1XPRTYBzN0jE9agRzyu3QObvTk75j4dkkbY0Yr6mRJiviDbn1EUr1Jkgn-c/s1600/prev.png) center;z-index:100;cursor:pointer;border-right:1px solid #ccc
#carousel #previous_button:hoverbackground:url(https://blogger.googleusercontent.com/img/b/R29vZ2xl/AVvXsEjARbHiovexPXdTJkLRdeNnTw_lsb25P8PazknwQEX7H4TKd49349Wmc681tslKf8e3ng-TxcUXEBJbmKznEN0iVp-VGsoq9YFIxiR3b6PseQmwkxdTwyOV1EhENqoM2E2-GAWTWkuQkB8/s1600/prev.png) center
#carousel #next_buttonposition:absolute;right:0;width:49px;height:185px;background:url(https://blogger.googleusercontent.com/img/b/R29vZ2xl/AVvXsEjrtIEpnAOjj_dlLWm9SOXtQgiUTSO-NEcqn5Q7rz1S1ZH8uaBJoot5leZk5ch4tZqNNL44_H2lkEjbrtqXMH1vjnWQYL5zoflVn3gxAVQgfclIX4nletpAwnS9jUNW4KX5wTpnZYAf_xg/s1600/next.png) center;z-index:100;cursor:pointer;border-left:1px solid #ccc
#carousel #next_button:hoverbackground:url(https://blogger.googleusercontent.com/img/b/R29vZ2xl/AVvXsEjWC2cDPMYVTmOkmXIk7WD6o8x7RTngnI6pl8LNdf9LTnmGy9ojQKDeaGcP-aMn5j2SzqtgZX9ufLP53aGoiCDiHrBwe7C0_YXVESHs72nL2OU4mxNGNEYr3ftE_MsKTTxgJO4CPOzl3K8/s1600/next.png) center
#carousel ulwidth:100000px;position:relative;margin-top:10px
#carousel ul libackground:#fff url(https://blogger.googleusercontent.com/img/b/R29vZ2xl/AVvXsEiui7kRVuKD7CiqcR5otSjcWzHL_2H9egAM1HwhE4dLPKWGv6n77wRvSpWYN2ZAIXoEt-ZdZHh7E7448cnChljyB9Cc8H1Z_D3RnMyxyD0E8zSARVa4iKa1aGs6OfNIO9-RnVQ6KdyEikA/s1600/main.png) repeat-x top;display:inline;float:left;text-align:center;font-weight:700;font-size:.9em;line-height:1.2em;border:1px solid #ccc;width:145px;height:150px;margin:0 4px 20px 7px;padding:6px;-webkit-border-radius:4px;-moz-border-radius:4px;border-radius:4px;
#carousel ul li:hoverfilter:alpha(opacity=75);opacity:.75;
#carousel ul li a.slider_titlecolor:#222;display:block;margin-top:5px
#carousel ul li a.slider_title:hovercolor:#cd1713
#carousel a imgdisplay:block;background:#fff;margin-top:0Look at some codes with the blue color above, that's the width and height of the slider in the demo that I made, change with your own size depend on your template width. - Still in Edit HTML, add this following code above </head> :Notes:<script src='http://ajax.googleapis.com/ajax/libs/jquery/1.7.2/jquery.min.js' type='text/javascript'/>
<script src='https://masolis-javascript.googlecode.com/svn/trunk/carousellite.js' type='text/javascript'/>
<script type='text/javascript'>
//<![CDATA[
imgr = new Array();
imgr[0] = "https://blogger.googleusercontent.com/img/b/R29vZ2xl/AVvXsEiDoc5BzT_rukuy9rCfHdJmxlEPrEwMTbnyWg305aQRsDbhLIw29a7NLrpH0elUVf5ALno3Zk3I3JnzojWPUAvs9pl3EkTW5-TfnT4Pouz_NPZc-6PXKRj1CYob9KHBWbGdb6PdYNG8jw8/s1600/no+image.jpg";
showRandomImg = true;
aBold = true;
summaryPost = 140;
summaryTitle = 25;
numposts1 = 15;
label1 = "news";
function removeHtmlTag(strx,chop)
var s = strx.split("<");
for(var i=0;i<s.length;i++)
if(s[i].indexOf(">")!=-1)
s[i] = s[i].substring(s[i].indexOf(">")+1,s[i].length);
s = s.join("");
s = s.substring(0,chop-1);
return s;
function showrecentposts(json)
j = (showRandomImg) ? Math.floor((imgr.length+1)*Math.random()) : 0;
img = new Array();
document.write('<ul>');
for (var i = 0; i < numposts1; i++)
var entry = json.feed.entry[i];
var posttitle = entry.title.$t;
var pcm;
var posturl;
if (i == json.feed.entry.length) break;
for (var k = 0; k < entry.link.length; k++)
if (entry.link[k].rel == 'alternate')
posturl = entry.link[k].href;
break;
for (var k = 0; k < entry.link.length; k++)
if (entry.link[k].rel == 'replies' && entry.link[k].type == 'text/html')
pcm = entry.link[k].title.split(" ")[0];
break;
if ("content" in entry)
var postcontent = entry.content.$t;
else
if ("summary" in entry)
var postcontent = entry.summary.$t;
else var postcontent = "";
postdate = entry.published.$t;
if(j>imgr.length-1) j=0;
img[i] = imgr[j];
s = postcontent ; a = s.indexOf("<img"); b = s.indexOf("src="",a); c = s.indexOf(""",b+5); d = s.substr(b+5,c-b-5);
if((a!=-1)&&(b!=-1)&&(c!=-1)&&(d!="")) img[i] = d;
//cmtext = (text != 'no') ? '<i><font color="'+acolor+'">('+pcm+' '+text+')</font></i>' : '';
var month = [1,2,3,4,5,6,7,8,9,10,11,12];
var month2 = ["Jan","Feb","Mar","Apr","May","Jun","Jul","Aug","Sep","Oct","Nov","Dec"];
var day = postdate.split("-")[2].substring(0,2);
var m = postdate.split("-")[1];
var y = postdate.split("-")[0];
for(var u2=0;u2<month.length;u2++)
if(parseInt(m)==month[u2])
m = month2[u2] ; break;
var daystr = day+ ' ' + m + ' ' + y ;
var trtd = '<li class="car"><div class="thumb"><a href="'+posturl+'"><img width="145" height="100" class="alignnone" src="'+img[i]+'"/></a></div><p><a class="slider_title" href="'+posturl+'">'+posttitle+'</a></p></li>';
document.write(trtd);
j++;
document.write('</ul>');
//]]>
</script>See the red URL script above, that's the latest series jQuery.min.js script code that I use to made this slider. And if you've found jQuery.min.js although with the different series in your template, the red codes no longer need to insert. There must be only one jQuery.min.js in your template, it is up to the serial number, if possible the latest version.Blue code (15) : amount of your post that display in the slider. news was a label that I choose to show up in slider. - Next step you must call the slider to appear in your blog. Place this following code above <div id='main-wrapper'>:<b:if cond='data:blog.pageType != "item"'>
<div id='carousel'>
<div id='previous_button'/>
<div class='container'>
<script>document.write("<script src="/feeds/posts/default/-/"+label1+"?max-results="+numposts1+"&orderby=published&alt=json-in-script&callback=showrecentposts"></script>");</script>
<div class='clear'/>
</div>
<div id='next_button'/>
</div>
<script type='text/javascript'>
(function($) $(document).ready(function()
$("#carousel .container").jCarouselLite(
auto:4000,
scroll: 1,
speed: 800,
visible: 5,
start: 0,
circular: true,
btnPrev: "#previous_button",
btnNext: "#next_button"
);
))(jQuery)
</script>
</b:if>You can also put the following codes in the bottom of your navigation menu or you can also placed in your footer side, that's depend on your needs. - The final step, save templates and see the results.
How to make an automatic Carousel slider based on labels?
How to Redirect Traffic from Your Old Blogger Blog to New Website: Normally, it is seen that most of the
newbie start his blogging carrier with blogger as it provides so many feature
almost at free cost. After setting up a blog, he/she may switch towards the big
goal i.e., can make a self hosted blog/website. In this whole journey, one
thing is very important and that is traffic to the new site.

Almost all the
bloggers wants to redirect traffic from their old blog to the new website or
self hosted blog. If you are also looking for the same then just go through
this post as I think this post is just for your help.
To redirect traffic from your old blogger
blog to new website, you need to follow some of the methods. Moving on, I have
mentioned some of the methods that can be use to redirect traffic from old blog
to the newer one.
How to Redirect Traffic from Your Old Blogger Blog to New Website
Post
advertisement on your blog:
This is one of the very simple ways to
shout among your visitors and hence informing about the new website. You just need
to post a notice board on your blog and it should be posted at the top of the
web page or below your menu so that visitors can see your notice without any
issue. You can also make the notice board attractive so that it can grab the
attention of your visitors.
If you have already got lot of followers
and subscribers on social networking sites like facebook, twitter and Google +
then you can easily inform your regular visitors about your new site. You just
need to post information on the social networks. Recommend your followers to
visit your new site.
Make
use of your subscribers:
How
you use your subscriber is also a major factor helps in redirecting traffic
from your old blog to the newer one. There is a major difference between a Pro
blogger and a new blogger. It is seen that new blogger never give so much
priority to their subscriber while on the other hand Pro blogger always send
and inform their subscribers about the new stuff. You should always remember
one thing and that is subscribers are one who comes back to your site so you
need to give importance to them. You should always try to inform them about the
new stuff and content of your site.
Redirect
your old blog to new website:
You can also redirect the visitors of your
old blog to the new address simply by putting a simple code in your blogger
template. After you insert the code in blogger template, your visitors would be
able to visit the original site only for a few seconds and will redirect to the
new website.
So these are some of the methods I have
from my side. I tried to share most of the points that will helps in
redirecting visitors to the new site from the old blogger blog, however if you
think that I have missed something or have written anything wrong then always
feel free to leave a comment via comment box.
How to Redirect Traffic from Your Old Blogger Blog to New Website
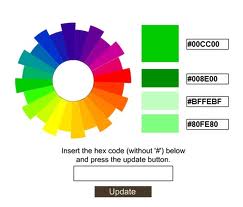
Just to tell you all that for the flexibleness and easy Blogger Template customization, I actually have revealed very helpful tool which will help you get the hexadecimal color value or RGB value for any color you would like. These tools are advanced integrated versions of color pickers utilized ingraphic software like Photoshop. i'm happier than you'r as a result of currently I don’t have to be compelled to open Photoshop on every occasion for selecting my desired color or eat my brain to find matching colors


